This section describes the syllabus (topic list) for Argentine Tango. Generally speaking, all of our private lessons will refer to areas within this syllabus.
A The Embrace
This section describes the key principles taught for the embrace.
Embrace variations
Embraces typically vary, depending on factors including:
Closeness (body-to-body contact or further away)
Angle (the amount of “V”)
Lean (or weight sharing)
Offset (how much they are to the right of each other’s center)
Some common types of embrace
This section describes a few common embraces in Tango, and how each is best used.
Variation 1: Close parallel embrace: “Airport hug”
Contact along the upper body, solar plexus to solar plexus, symmetrical
Well suited for walking and small movements, typically with traditional music
Axes can be separate or shared — so “lean” can vary
Not ideal for sweeping movements, crosses, or flashy steps
Variation 2: Open: “Looser hold”
Contact along the length of the “inside” arm (man’s right arm, lady’s left arm) — no torso contact
“Outside arm” (man’s left arm, lady’s right arm) — not too much pressure, not used as the main lead
Both dancers must be on their own axes
Suitable for sweeping movements or flashy steps
Not suitable for small movements or walking steps
Variation 3: V Embrace: “Angled”
Closer contact on the man’s right (lady’s left) side, more open on the other side
Provides space and support for doing some figures including volcadas and crosses
Requires continuous dissociation from the lady (between chest and hips)
Well suited for rotation-based movements
Variation 4: Practice
Hands on each others’ shoulders
Not generally used in social dancing
Useful to work on concepts such as dissociation
As this is a symmetrical hold, this helps practice movements in both directions
Note: there are many other variations (and variations of variations) possible.
Deciding which embrace to use
There are different philosophies for how to determine which embrace will be used. But for the purposes of this syllabus, we will assume that the embrace type is offered by the leader, and is then accepted or rejected by the follower.
It’s a negotiation (or collaboration), but ultimately, the follower determines how close she wants to be to the leader
Neither leader nor follower should attempt to force an embrace style on the other partner
It’s quite possible to alter the embrace during the course of the tanda, or during the dance itself
If the two partners cannot agree on the embrace style to adopt, it’s probably best if they don’t dance with each other
Getting into the embrace
An example sequence of events for setting a close embrace might be:
The leader connects with the partner’s chest first
The leader places his right arm lightly around her back, while raising his left arm
The follower raises her right arm, and the leader’s left hand joins with it
The follower reaches around the leader with her left hand to set the embrace (depending on the height difference, the follower’s left hand can go around the leader’s neck, shoulders, or back)
Key principles
The order of this process is not set in stone
This process should not be rushed — it should take, at least, 5-10 seconds to complete
It’s a good idea to use the “intro” phrase of a track for this purpose
The arms should end up in the place that makes the connection work, the embrace shouldn’t end up where the arm position happens to force it
B How to Stand
In Argentine Tango, the topics of posture, axis, groundedness, and balance are interdependent; they’re grouped together here under the heading of “how to stand”.
Balance
Our balance relies on a combination of our inner ear mechanism, feedback from our body, and response from muscles.
There is also pivoting on the ball of the foot, and this is something that both leaders and followers have to practice in order to achieve balance through the movement and a degree of control — so that we are balanced through whatever amount of pivot we do.
Posture
Keep axis vertical and shoulders horizontal
Use the core muscles to move around your vertical axis (not a rotation of shoulders!)
Keep shoulders relaxed and “down”, and head and chest “up”
Maintain your posture, especially when changing direction and pivoting
Think “lifting up” everything above the waist, and “pushing down” everything below the waist
Groundedness (“stability”)
Definition: being grounded means focussing your energy downwards into the floor — being stable. So being less grounded means being less stable.
Good stability is a key technique area for good dancing
Being grounded is helpful at all times, and especially when doing movements which can involve loss of balance — pivots, leans, and so on
The leader “grounds” to indicate weight change to the follower, and the follower “grounds” to let the leader know where her weight-bearing foot is
To become grounded, lower your hips slightly closer to the floor, and at the same time push into the floor with your weight-bearing foot. Walk as though the floor was six inches lower
Axis
Definition: “axis” is a notional vertical line through your centre of gravity, lying somewhere between your navel and your spine, running up through your neck and head, around which the body can twist — e.g. chest relative to hips. Below the navel, the axis continues down into the foot of the supporting leg.
Each partner should always be balanced on his or her own axis. In other words, don’t fall over
Your weight should be towards the front of the foot of the supporting leg
The follower’s non-weight-bearing leg (the “free leg”) is relaxed — free from any muscle tension so that it can respond naturally to changes in direction from the lead
The leader should ensure the follower has arrived on her balance point before executing a change in direction
Isolation, free leg and collection
Isolation (“dissociation”): the chest (and above) being independent from the hips and below, with the chest and hips facing different directions from each other. For forward and back steps, the hips point in the direction of movement; for side steps, the hips are perpendicular to the direction of movement
Free leg movement: the non-weight-bearing leg (the “free leg”) should always be able to move freely. This is especially relevant for followers, who need to move their free leg without transferring weight, as part of each step
Collection: by default, bring the feet or ankles back (or close) to each other between steps, though not necessarily pausing there
C Lead & Follow
Connection
The lead is an indication of the leader’s intention, or a gentle guide, given as an invitation
The follower receives the lead (intention) and does the movement with (or guided by) the leader
Project your energy towards each other at all times, and make your presence felt
Use the core muscles to twist from the waist in order to keep the upper torsos opposite one another
The Leader’s Role
The leader should:
Give clear, smooth and gentle leads, with a minimum of force, that do not disrupt your partner’s balance
Lead from the centre (the chest, shoulders and arms should move in unison, not independently)
Communicate on which beat or beats the step should be done
Be aware which leg is the follower’s non-weight-bearing leg and is therefore free for movement
Maintain the comfort and safety of the follower
Fix or recover from any mistakes, whether they are yours or the follower’s
Embellish as you see fit, as long as it fits with the steps that you lead
The Follower’s Role
The follower should:
Do the steps that are led, in the rhythm that is led
Aim to stay in front of the leader’s chest
Take consistent, predictable steps
Keep track of which foot your weight is on (you don’t need to worry about the leader’s feet or weight)
Only change weight when led to do so — it’s not always when he steps
Maintain your balance and stay on your axis, unless led off it
Embellish (or adorn) as you see fit, as long as it fits with the steps that are led
D Core Movements
Forward / back step
The sequence of events for leading and taking a step is: lead, follow, follow.
A more detailed explanation:
The leader signals his intention by moving his chest (centre) forwards
The follower extends or moves her free foot back
The leader starts his step, into the space that the follower has made available
The follower transfers her weight onto the foot
An even more detailed description:
For the leader, intention to move forward can be expressed by allowing the upper body to move but delaying the leg movement by touching the thighs together. The foot is then moved forward so that the lower legs are in an upside-down V shape
The leader then pushes off from the back foot and straightens the back leg, transferring his weight and axis to the front foot (and the follower’s weight onto her placed back foot)
The follower responds to the leader’s intention and projects her non-weight-bearing leg backwards, starting the movement from the core — “squeezing” the thighs en route and straightening the leg without transferring any weight onto it
The leader transfers the weight of the follower onto the foot of the projected leg
Although the follower is moving backwards, her energy is projected forwards towards the leader. Her backward movement comes from the leader’s “stronger” energy, not from a self-generated step
Weight Change
Change weight from one leg to the other.
Feet (legs) should be in the default “collect” position — i.e. close together
The lead should not involve much, or any, real lateral movement — not a push to the side
The motion is more of a “lift then settle” movement
Followers, try to make it clear to your partner that you have changed your weight
Can be done quickly, so suits double-time movements and milonga movements nicely
Sidestep
This is a step to the side, and uses the same lead-follow-follow technique as the forward / back step.
The order of movement is:
The leader signals his intention by moving his chest (centre) to the side, usually also lowering a little by flexing the knees
The follower extends or moves her free foot to the side in the same direction as indicated by the leader
The leader starts his step, in the same direction that the follower has just moved her foot
Both transfer their weight
Rockstep
A small forwards-and-back rock-step.
Useful to navigate around corners, to pause in the dance, and to decorate or vary the steps
Only transfer a portion of the weight forward and back, not all of it. The less weight transferred, the easier it is to speed up — if all weight is transferred, it becomes a small step, not a rock-step
Can be done quickly, as it’s a small movement, so it works nicely for double-time and milonga movements
Pivots
Pivots are typically performed by the follower, either clockwise or counter-clockwise, based on the lead.
Pivots are created by the tension or torque in the body resulting from twisting using the core muscles — rotating the chest and ribcage independently of any hip movement
Direct your energy towards your partner and keep chests as “opposite” as possible before leading or following the pivotal movement
Keep balanced, stay on axis, and ensure the pivoting foot is grounded as though putting out a cigarette butt
E Common Patterns
The Cross
Referring to when a dancer, most often the follower, crosses one foot in front of or behind the other.
The most common use of this is when the follower crosses back and crosses her left leg over her right. The sequence for this involves:
Leader leads the follower to extend her leg straight back as the first part of a back step
Follower transfers weight to the back foot
Leader leads the follower’s free leg to transfer diagonally in front of her back leg, into a crossed position (followers need to keep their hips facing the leader at this point)
The follower then transfers her weight to the front leg, ready to move back with the back leg
Forward Ocho
Commonly done by the follower — conceptually this involves a pivot plus a forward step, or a forward step then a pivot.
Done when the follower is perpendicular to the leader
The step, then pivot, is done on the leg closest to the leader
The follower must keep her upper body facing the leader as far as possible
Can be led with no leader foot movement (leader leads with chest only), or in crossed-system with the leader taking sidesteps alongside the follower’s forward steps
Back Ocho
Concept: pivot plus backstep, usually led in crossed-system. Commonly done by the follower — conceptually this involves a pivot plus a back step, or a back step then a pivot.
Done when the follower is perpendicular to the leader
The step, then pivot, is done on the leg furthest from the leader
The follower must keep her upper body facing the leader as far as possible
Best led in crossed-system with the leader taking sidesteps alongside the follower’s forward steps
Does not work well with no leader foot movement, because of the follower’s axis being further away
Common variation: travelling back ochos, where the leader’s steps are diagonally forward in the line of dance
Giros (molinetes)
Leader pivots, follower steps around the leader in a grapevine step/pattern: back, side, forward and pivot, side and pivot, repeat.
This pattern can start, or stop, on any step — forward, side, or back
The follower must aim to stay directly in front of the leader’s chest, or catch up as soon as possible, but must not overtake the chest movement
Collect, and pivot as needed, between each step
The back-side-front portion can often be danced to a quick-quick-slow rhythm, as no pivots are required
Track variations
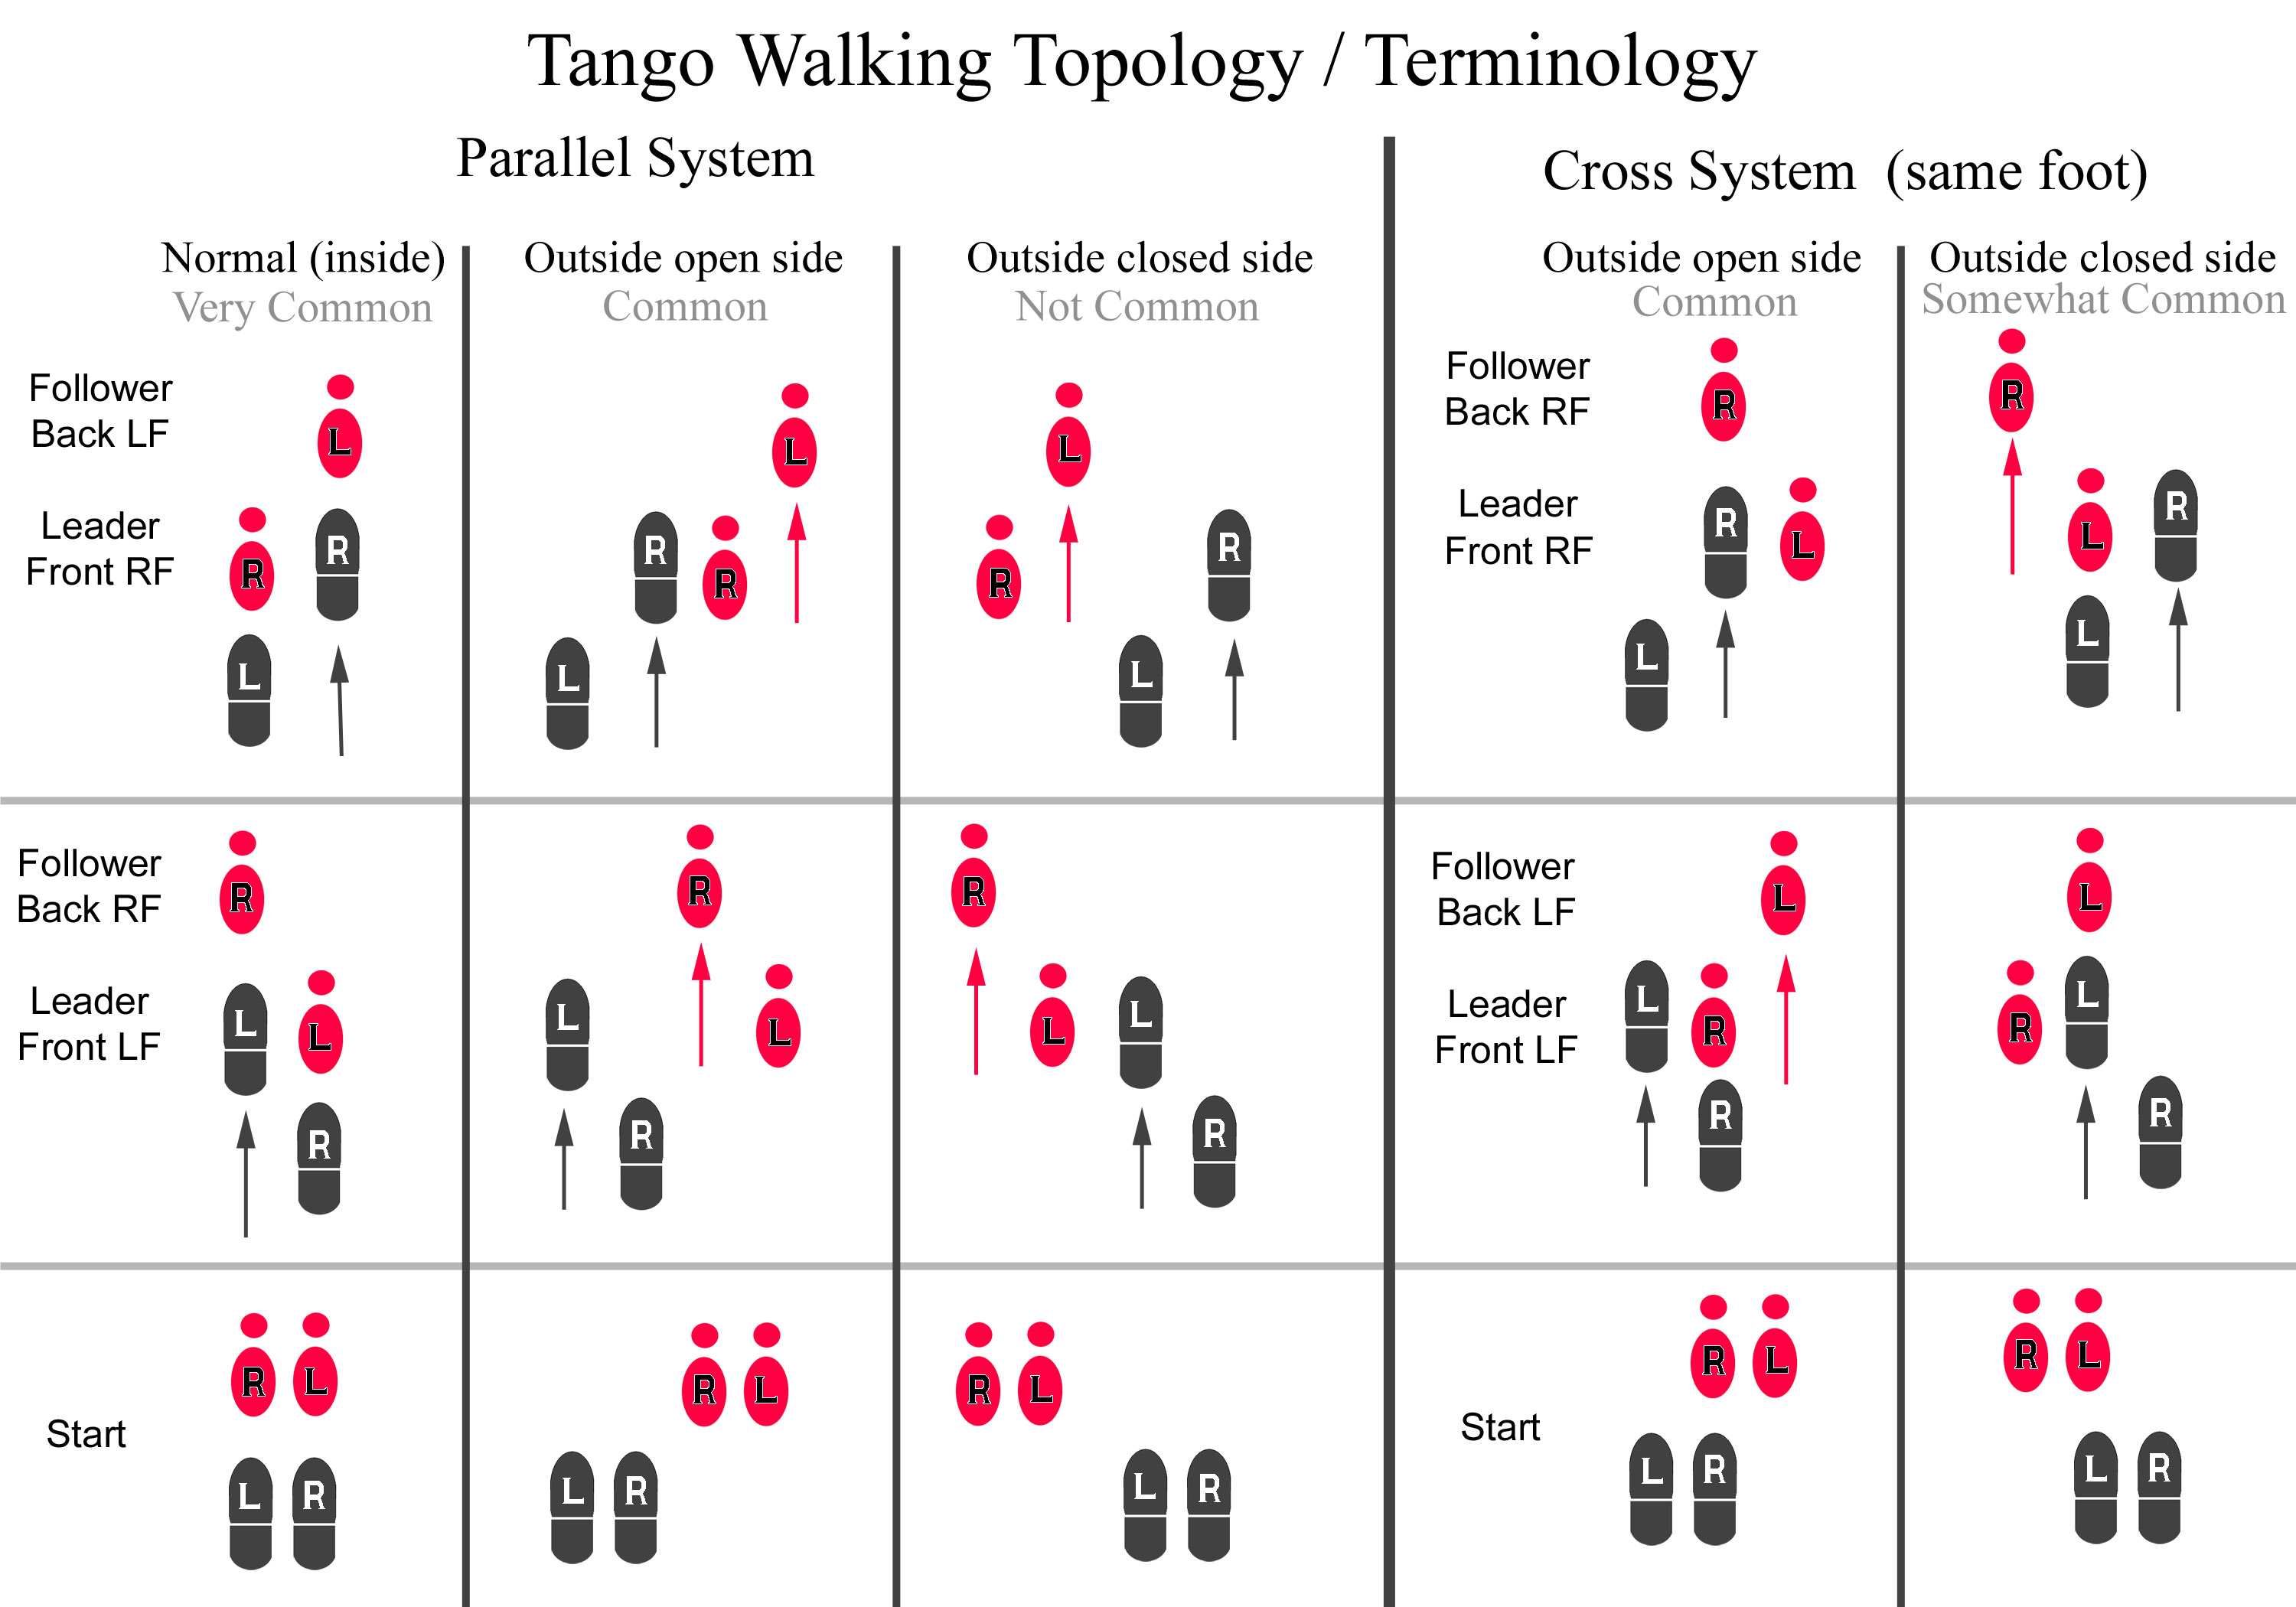
2-track: walking in parallel in front of the partner
3-track (crossed system): the man slightly offset from the woman, with “middle” legs moving in synchronisation — typically the man’s right leg moving in sync with the woman’s left, though it can be done on either side
4-track: walking in parallel to one side of the partner, typically with the follower on the leader’s right side, though it can be done on either side
“Dancing” topics refer to general information about social dancing.
Line of Dance
Always done counter-clockwise around the room
There is usually a “lane” on the outside of the room, and there may also be an “inside” lane, depending on the venue and number of dancers
Basic Tempo Changes
Basic changes of tempo include:
Single-time: stepping on the main (strong) beat or pulse in the song
Double-time: stepping on the strong and weak beat
Pause: pausing, when there’s a pause in the music
Other variations are possible, of course — half-time, and so on.
By default, forward and back steps are done in single-time
Changes of weight and rock-steps are often, usually, done in double-time
Timing changes of steps are the basis of dancing with musicality, as they allow you to interpret the differences in the music through your dancing.
Improvisation
Argentine Tango is an improvised dance. There is no “Basic Step” like in ballroom dancing — all basic steps or patterns are simply drills, or teaching exercises.
Leaders: simple, good steps, done to the music, are dancing
Followers: relax, wait for the lead, don’t anticipate the next step
Improvisation for leaders: this involves changing your movements to fit the music, the space, and your connection with your partner
Improvisation for followers: this involves stylistic movements and changes to your steps, including embellishments as appropriate
Basic Etiquette
Definition: tanda — a group of three or four songs, occasionally five, of the same style or artist.
Definition: cortina — a brief clip of non-tango music, used to separate the tandas.
The “3 dance rule” — normally, you would dance the entire tanda (three dances) with the same person
“Thank you” indicates that you are done — not a good thing to say in the middle of a tanda
The mirada and cabeceo: eye contact used to ask for a dance, and the nod to accept it, or looking away to decline
During a song, don’t walk straight across the dancefloor, or stand and talk on the dancefloor for an extended period
If there’s a bump, both couples apologise and check no one’s hurt
Try to be fresh for your partner — showers, deodorant, breath mints etc. — but don’t overdo the aftershave or perfume
G Milonga & Vals
Milonga
Milonga music typically has a faster rhythm (DA-DUM DUM-DUM, slow-quick-slow-slow)
More of a fun, bouncy, lively feel
Fewer or no pauses — there’s an expectation you’ll usually step on every “slow” beat, and sometimes the fast beats too
Traspies (quick double-time steps) are often used
Smaller steps
Vals
The “tango waltz”
Vals music is based on a 1-2-3, 1-2-3, 1-2-3 rhythm
Three quick beats per one slow beat
If you only do slow steps, stepping on the “1” beat, it’s very similar to tango
Double-time steps are common — for example, stepping on the “1” and the “3”, when the leader wants
Steps are potentially larger than tango, involve more turning, and have a more “pendulum”, flowing feel
H Tips
Good Floorcraft for Leaders
Keep moving forward as space becomes available — don’t cause backups
Do not cause collisions
Avoid overtaking, unless it isn’t crowded, the couple in front isn’t moving for an extended period, and you’re certain it’s safe to do so
Avoid stepping backwards, unless you’re certain it’s safe to do so
Stay in lanes when crowded
Protect your follower — from collisions, getting kicked, and so on
Don’ts for Leaders
Leaders, do not:
Teach on the dancefloor
Crash around the floor like the proverbial bull in a china shop
Give people hard looks over minor things
Harass a follower into dancing with you
Drink fizzy drinks and then dance with women with long, loose hair
Good Floorcraft for Followers
Keep your feet low when the milonga is crowded, or others are nearby
Be aware of the leader’s blind spots: behind himself, and to his right
Don’ts for Followers
Followers, do not:
Press down so hard with your left arm that you crush his right arm against his body
Auto-ocho
Do ganchos unless you’re both certain it’s what is being led and you know the proper technique — kicking your leg back isn’t the proper technique
Take your foot up unless you’re certain it’s safe to do so
Harass a leader into dancing with you
Doubt yourself while dancing. Take your steps with confidence — pausing or asking “did you mean to do that?” messes everything up